
Email-to-Flow is available on the Salesforce Appexchange.
If you haven’t gotten a chance to review Introducing Email-To-Flow, a low-code Email Service, please do. This will give you a general overview of Email-to-Flow. If you have reviewed the article, let’s waste no time and dive into the mechanics.
Step 1: Set up an Email Service with the EmailServiceToFlow email service provided by the package.

I thought this was a flow solution. Why are we still creating an Apex Email Service?
Until Flow has the capability to ingest an email message, we still need a mechanism to ingest the email, process the data, and send the contents to our flow. To do this, we leverage the Email-to-Flow apex email service. You simply have to configure the Email Service and create the Email Address. Rest assured, Email-to-Flow will handle the rest.
Step 2: Review the Email-to-Flow custom metadata type configuration. This tells the email service which flow to run for the specific email address. In this case, we are running the delivered Create Case Flow.

Ok, what’s the purpose of the Custom Metadata Type?
The Custom Metadata Type is our link between the apex email service (the logic that is ingesting the email, processing the data, and pushing the results to the flow) and the specific flow that will process our business logic. In this example, we are instructing the email service to call the Create_Case flow (which is our replacement to Email-to-Case).
Step 3: Review the Create Case flow. Clone it and make your own, or leverage it as is.
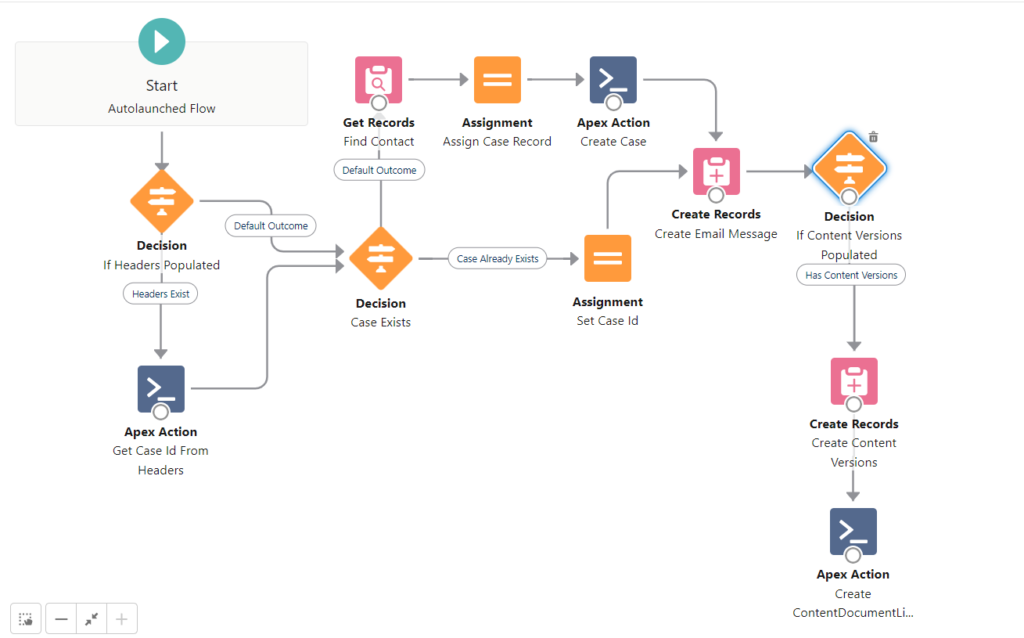
Great. What’s are the steps of the flow?
Good question. Let’s break down the steps of the flow. As a reminder, the Email-to-Flow email service has already done the heavy lifting of processing the email. On execution, the flow has been seeded with all the information required from the email envelop, the email message, the headers, and the text and binary email attachment. The flow simply needs to decide what to do with this information.
Get Case Id From Headers: The first step in an Email-to-Case process is to determine if the case is part of an existing case or a net new case. The good news? Salesforce provides an apex method called getCaseIdFromEmailHeaders() which helps make this determination. The bad news? It’s not exposed in Flow. No worries. One of the many Apex Actions included in Email-to-Flow is available to get the job done. This Apex Action returns three pieces of information.
(1) Case Id: The Case.id of the existing case (if this is an existing case)
(2) IsClosed: A boolean value to indicate is the case is closed or not
(3) Status: The specific case status
In the default flow above, the IsClosed and Status fields are not used. If the case exists, it will be updated. In your implementation, the default flow template can be modified for you specific use case. For example, if the case is closed, created a new case.
Case Exists: The case exists decision simple defined two paths. If the case already exists, use that case id and move along in the process. If the case does not exist, create a new case.
The create case path include an attempt to find the relate contact based on the email from address. The default behavior is to find a contact where the email address matches the from email address. Again, since this is a flow template, the logic can be modified to suite your business requirements. For example, maybe you want to create a new contact if it does not exist.
Create Email Message: The Create Email Message step creates the Email Message record and relates it to the case. Again, this process can be modified as needed. For example, your business may decide header(s) data is not valuable and is eating up precious data storage space. You can modify the step to exclude header(s).
Create Content Versions: If the email included text/binary attachments and the configuration in step 2 allowed for the attachments to be saved, the Email-to-Flow does all the heavy lifting to pre-populate a collection of Content Versions. Note: Content Version are the equivalent of “Files” in Salesforce. If your implementation requires the process to leverage Attachments versus Files, this switch can be made. Or maybe your business does not want to store any File named “Application%”. These changes can be made within the flow.
Create Content Document Links: Files are linked to the Email Message via Content Document Links. A handle Apex Action takes the trouble out of setting up flow to many this creation process. In the event your implementation requires Files be attached to the Case rather than the Email Message record, simple change the default in the step.
That’s it?
That’s all there is to leverage Email-to-Flow as your Email-to-Case replacement. Looking for more than a step by step replacement to the standard Email-to-Case process? Check back here as we walk your through other functionality available from Email-to-Flow.